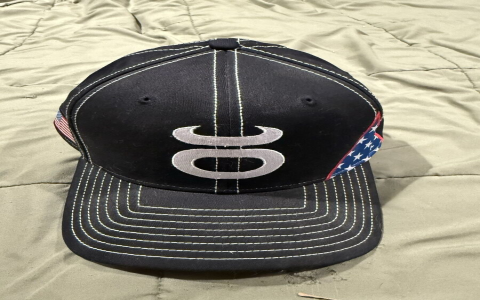
So, I’ve been wanting to make this MMA hat for a while now, you know, one of those cool ones with all the patches and stuff. I finally got around to doing it, and let me tell you, it was a bit of a journey.
First, I needed the hat. I just grabbed a plain black baseball cap from a local store. Nothing fancy, just a regular, run-of-the-mill hat. I made sure to find one that was plain and didn’t have any logos on it, and make sure to find one that fit me well. I didn’t want to have to redo everything if the hat was too small or the design was too cluttered.
Gathering the Goods
Next up was the fun part – collecting all the patches. I went online to a few different websites that sell MMA and jiu-jitsu gear. Man, there are a ton of options out there! I found some with really cool designs for brands and gyms, and I even grabbed a couple of custom ones with my own name and my gym’s logo. It took me some time to decide on what patches I would buy, but after I finished searching I ordered them straight away.
After I got my patches, I also needed to grab some basic sewing stuff like needles, thread, and maybe some fabric glue just in case. Good thing I already had some of these at home, otherwise it would have taken even more time to go to the store and buy them.
Getting to Work
When all the patches arrived, I spent a good chunk of time just laying them out on the hat, figuring out where I wanted everything to go. This took way longer than I thought it would! Moving stuff around, trying different combinations, it was like putting together a puzzle. There are a lot of different ways that I could put the patches on, and I wanted to make sure I was happy with the arrangement before I started sewing.
Once I had the layout down, I started sewing. Now, I’m no expert seamster, but I know the basics. I started with the bigger patches first, just to anchor everything. It was slow going, making sure each stitch was tight and secure. I put some music on and got to work. My fingers were definitely feeling it after a while!
- Sewing: I hand-sewed each patch onto the hat.
- Glue: For some of the smaller, more detailed patches, I used a bit of fabric glue to hold them in place while I sewed.
- Patience: This was key. It took several evenings to get everything done.
The Finishing Touches
After all the patches were on, I gave the hat a good once-over, checking for any loose threads or patches that needed a bit more reinforcement. I even added a little extra stitching around the edges of some patches, just to make sure they were really on there.
Finally, I was done! It wasn’t perfect, but I was pretty darn proud of how it turned out. It’s definitely a unique hat, and it represents my journey in MMA and jiu-jitsu, and maybe some other things I was interested in, like anime. Wearing it to the gym the other day, I got a bunch of compliments, which felt pretty good. It’s not just a hat now, it’s like a little piece of my personality that I get to wear around.
Overall, it was a fun little project. Took some time and effort, but totally worth it in the end. Now, I’ve got this awesome, one-of-a-kind MMA hat that I can rock. If you’re thinking about doing something similar, just go for it! It’s a cool way to express yourself and show off your love for the sport.


